This is my Blog on how I was inspired to transform an old tired BMW K100RS into something more interesting......I'll let you decide on whether I succeeded...........
Having been inspired by a Suzuki powered cafe racer back on Boxing day of 2014, at the Annual Classic vehicle meet in Wickham square, Hampshire. I decided to Google cafe racer images, this is when I saw this image for the 1st time:
My brother happened to be riding a K100RS at the time and constantly went on about how amazing it handled for an older machine. Certainly the single side swing arm and "brick" based engine made this far more interesting than perhaps many conventional cafe racer converts.
As if by chance my brother called me just a few days later to ask if I was interested in an old, unused for at least a year, 1990 K100RS 16v. "Interested" I said. "I've been drooling over the prospect of converting one in my newly sorted garage, for the past few days".
So having parted with just £300, on January 11th 2015 I arrived home (thanks for the lift in the van Bob!) with this:
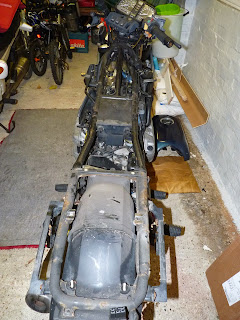
My first stage of the mission was to strip this cobweb entangled, corroded old Beamer of all it's heavy duty plastics, so off came all the fairings, rear seat unit, mud guards, indicators etc etc.... until it looked like this:
There was a far amount of corrosion all over the bike, but nothing that an enormous amount of elbow grease wouldn't sort:
As you can see the injector tube would need pulling at some stage and respraying, as would the entire frame:
Oh and a drill with polishing mop like this:
With added Autosol metal polish was very useful in turning furry ali parts like this:
And this:
Into something a little more presentable.
So I began labelling cable connections, prior to getting to the point where I could pull the frame off the engine.
One of the many great reasons to take on a K100RS is that once you remove the frame, the engine stays on it's centre stand, with the back wheel and exhaust.
So just over a week later the frame was off.......
and I could begin removing all parts that I did not want on my finished machine:
I then filled any unsightly tubes (from slightly over zealous grinding) that were marked before hanging and painting.
And while the paint dried I got on with more polishing etc etc ......
The wheels:
No not these beauties ( fantastic as they are, just wish they made them wider for greater rubber options) but these type:
Would not remain silver (the paint was already partly worn through to the beige primer coat), but painted the same metallic black as the frame.
While the paint dried on the wheels and frame I began the (what now seems like) enormous task of manufacturing my own rear seat unit. Yes I could have bought many via Ebay etc. but my fear was that not only would they not fit my frame (and how i had cut it) but would be disappointing in quality. So having found this fantastic piece of work via Youtube:
Watching most of these 20 min. plus films from Hackaweek TV, gave me the insight, encouragement, and know how, into taking on my first ever Glass fibre construction.
If you have sat and watched how this guy made his tank etc. I think like me you'll be converted into a confident enough 1st timer to take on most tasks ahead.
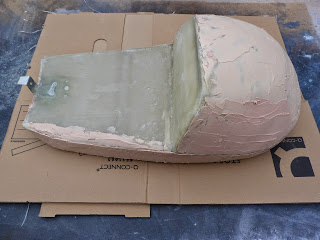
So I began making this:
Doesn't look much now but this is of course upside down, the grey plate is to help both strengthen and will take tapped holes for the securing bolts later. The yellow panel is 5 mm thick G.R.P., bonded with P.U GLUE to the foam.The expanding foam, is PU glue, used to help stick and strengthen and broken already moulded rigid foam. The expanding PU glue was later easily cut with a sharp Stanley type knife, when hardened and dry.
This is how it looks after the Resin and Glass Material had been laid over (two layers) I learnt the hard way about air bubbles and their effect on the outer skin strength. That is why so much filler ended up being used, and as I sanded down, this filler it exposed more defects, which then need more filler and so the vicious circle of filling, rubbing down, filling began.
And more rubbing.....

and more filling......
And more sanding ......
Until it finally ended up like this:
As you can see in this picture, the tubes of the rear end have been cut, these will take bar end indicators, the wires run out through small holes pre drilled in the frame prior to spraying. The rear light unit does not stay. turns out as great as it looked when braking, the standard L.E.D 's were white (not red), so pretty useless for British roads.
The tank on these BMW's are of course aluminium, so nice and easy to work on, and rub down to a smooth surface prior to priming.
The original bars shown in this picture also moved on, but for the first time you can see the newly painted black wheels and Frame.
This picture shows better the rough shape of the seat unit, and as you can see with the tank, I had cut off any tabs etc. of unwanted ali, to give it a real clean look along the base edges. Looks nice in brushed Aluminium I thought, almost had me thinking about leaving it that way for a while........
This next picture is really the kind of look I was heading for.....
Although with such a big tank and heavy looking engine, I made my seat unit larger, more balanced.
Very nice in many respects, but I did not like the holes under the tank, and the various parts still on the frame, mine just had to be cleaner.
Next came the task of painting...
In many respects I was really looking forward to getting my chosen colour down onto the seat unit and tank, at first I thought of going the more classic look like above, perhaps a Honda metallic bronze
or similar....but I listened to my wife who said "surely you want it to stand out a bit more, make more of a statement"........
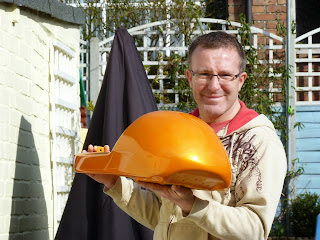
And so after many nights in the dusty old garage (no where near ideal for painting, with cans) I got the rear seat unit to looking like this........
The colour in case any of you are wondering, is Ford Focus Electric Orange, bought via Halfords. I used a Petrol Resistant Clear Lacquer on the tank, and all other parts, just in case another type on the seat and front mud guard /fender, had an effect on the orange.
She did say "a statement" "stand out".......
Next came the upholstery for the seat unit.......Out of the garage and into the kitchen. Originally I wanted to buy my own material and stitch with orange thread in a diamond padded design. Unfortunately I could not get on with my sewing machine (1964 Singer bought for 25 pounds just for this) so I gave in and bought black diamond padded material (pre-stiched). The seat base was made from heat formed plastic fascia board (used my old gas fired gun to warm then bent to required shape).
This (above) is the first attempt, and turned out fairly good, but it turns out the tab at the front to fix to the tank, just didn't work out, and was cut off.
I then spent time forming a new seat base (in one piece) that goes from base up to the tank.
This is how the bike looked with most painted and the initial seat unit padding in place:
So having got this far it was now time to address the brake issues.....
When I got the bike the front reservoir was empty of fluid, so I had tried to split the callipers but the Allen bolts were not budging. I had checked the pads (o.k) greased the pins and backs of pads with copper grease, and checked the movement of the pistons (all seemed o.k). I bought via: https://www.motobins.co.uk/
New brake lines, fluid, and banjo bolts, but once fitted the fluid failed to pump through the system for bleeding. So back to Moto-Bins for the front master cylinder piston.
It turns out that you can't remove the piston, without first removing the brake lever, and to remove this you simply remove the brake lever pivot bolt...........................oh no!
This pivot bolt which (simply?) bolts into the brake lever, would not come out, the Allen key bolt rounded, Then having removed the reservoir and jammed it into a vice I proceeded to drill into this bolt and use a bolt remover.......which snapped...so I drilled that out, and with a bigger hole, another larger bolt remover...............which also snapped! as did I !!!!!
In the end I drilled the whole bolt out of the reservoir but in doing so damaged the small nylon sleeve/cup that sits in the reservoir (this is where the pivot bolt end actually pivots).
So back to Moto-Bins for a new bolt, AND a new brake lever. In the end, I managed form a new nylon sleeve/cup for the pivot bolt from the end of a Rawplug, it fitted perfectly, and with a little internal filing the pivot bolt fitted snugly inside......
So having done all the above the master cylinder finally worked, and the fluid pumped on through the new lines, and having bled them the brakes felt good.
Now the rear brake was fine (or so it seemed initially) having fitted the new line and bled the calliper it felt fine, and so I proceeded to test the front and rear brake switches....Front ...All Good, Rear ...again All Good...but what was this....oh bugger! a hydraulic leak from the rear master cylinder piston rubber. if I had not had spotted this then, I may have been thinking why I ended up in a hedge somewhere down the road later........
Sounds obvious, but always check all fluids for leaks and double check you have tightened all bolts/screws to correct torques.
So having done the front, I knew I just had to replace the rear piston (again via Moto-Bins). This was a tricky job, as the metal cup that takes the pressure from the rear brake lever, pushed off the lever nipple and bent the piston, causing it to jam in the cylinder when I attempted to bleed the system.
Having spent £50 on this part I was not about to be beaten by this, and so after removing the rubber boot, filing the piston (just at the end, not in the sealed bore) and putting that bloody rubber boot back on, etc. etc. the rear brake finally worked as well...................no I did not enjoy that part...not one bit !!!!
So having sorted the brakes, redone the seat unit, sprayed the underside of the clocks, the brake fluid cap, and the BMW on the engine casing (painted around the letters in grease, masked around that area, then sprayed the top surface) , gave it a clean and polish (for the first time since spraying), it finally rolled out of my garage into a bright sunlit day, just what that electric orange needed......
Without the seat padding .....
With those new bars ...............
This rear light doesn't get to stay (the one with the wrong colour L.E.D 's)
The seat unit is not fixed into position here (hence it is not on even)
After four months of doing this .....Expect hair loss (especially with those brake issues)
New rear light sorted, and the oval shape definitely suits the rear better.....
It is not yet complete...still many things to do such as:
If all goes well....fit a new rear shock......
Probably cut more off that front mud guard /fender.....
Lower the clocks and drop the light a little......
Spray the foot pegs (the three rectangles, as seen in the example below)
Not clear in the pictures perhaps, but I have cut away the rear peg sections....
(will probably replace with more modern type rear sets later)
done it now, as well as a few other things since 2015..... see below:
done it now, as well as a few other things since 2015..... see below:
Polish the exhaust pipes up to the outlets.......
Remount the injection/fuel control unit (make the space above the battery clear)......
Polish the engine casings more.......
Perhaps ? cut the exhaust and re weld so it sits up like this:
If I were to buy another K100RS for a project that had been off the road for some time I would expect the following: that the brakes will need a complete overhaul, the frame will be rusty, the wheels will need respraying, change the fuel filter, and all other filters, the battery for a decent gel one, check front forks for pitting, rear shock chrome piston for rusting/ wear, expect the fuel injector tube to be rusted (and replace the 'O' rings before putting back on) .............
But for now all I really want to do is ride into this:
or this....
but please......... no more of this....
Hope you found this if not interesting, at least informative....
Thanks for checking my Blog out....
Dean


